Skip to content
Close (esc)

Taproom and Beerhall Closed for Chti

After a BEErilliant year, the Taproom and Beerhall teams are off for a well deserved break.

We'll be open again on 4th January - can't wait to see you then!

Merry Christmas and Happy New Year!

Shop Now

Age verification

By clicking enter you are verifying that you are over 18 years old.

HIVER’S GUIDE TO CIDER MAKING

Thanks for joining us for Hiver’s Cider Making Workshop.

You’ve now got the skills to become a master cider maker.

This guide will show you how to finish off your first batch you started with us, and has the steps so you can make it all again - from pip to pint!

PS. If you have just completed the Hiver Cider Making Workshop, skip straight to step 5: Fermentation.

  • PICK - PREP - PULP - PRESS - FERMENT - BLEND - SWEETEN - BOTTLE - ENJOY

5. FERMENTATION

Here’s are our foolproof steps of fermentation:
1. Add the yeast & mix, wait half an hour and mix again. (if you’ve just taken part in the workshop, you can skip this step as you already did it!)
2. Prepare the airlock by filling it to the line with water or a spirit such as vodka
3. Ensure the ‘bung’ of the airlock is dry and now push inside the top of the demi-john until secure 
4. Add the start date to the sticker on the front of your demi-john along with your hydrometer readings and apple varietal/s
5. Put the container in a cool, dark cupboard thats about 15 degrees C (no colder than 12 and no higher than 20)
6. After a few hours you should notice bubbles starting to form in the cider - fermentation has started
7. If fermentation hasn’t started after 48 hours, give the cider another good shake and put it somewhere very warm to help kick start fermentation - once started immediately transfer back to cooler storage environment
8. Check your cider every few days (check airlock still has water in it). Ask yourself:
- Is cider clear? Yes
- Is there sediment in the bottom? Yes.
- Are bubbles still forming?
Yes... then keep waiting until the bubbles have stopped.
No? Then move on to step 10.
9. Add sulphites to your juice. Once added, wait 24 hours.
10. If you are ready to drink a still cider, then go on to the next step (11) to calculate your ABV. If you would like to make a sparkling cider then scroll down to 7B below.
Before you start drinking however and if you have a hydrometer, it's time to take your FINAL GRAVITY HYDROMETER READING. Check the reading is no higher than 1.0000 if you are going to store and mature the cider.
11. Calculate the ABV of your cider by:
ORIGINAL GRAVITY (eg 1.05) - FINAL GRAVITY (eg 1.001) x 125 = ABV% eg 6.125%
This handy online ABV calculator can help you out as well!

6. BLEND

If you’ve chosen to press your apple varietals separately, now is the time to add the juices together to create the base of your cider. If you’ve already blended or you are making a cider using just one variety then skip to the next stage!
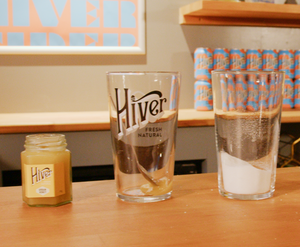
7. SWEETEN

Even if you’ve used the sweetest apples around, you will still need to sweeten your recipe. This is because all the apples’ sugars have been converted to alcohol in the fermentation process. You can choose to use a natural sweetener like honey or white sugar if preferred. Below are the steps to follow:

7. SWEETEN CONT.

There are 2 options here. If you want to make a still cider then follow steps A) Still Cider. To make a sparkling cider, follow steps B) sparkling cider.
A) Still cider
1. Carefully decant the liquid into a sterile bottle and leave a little gap at the top and leave sediment behind in the demi-john 
2. Have a little taste 
3. Add sugar or honey based on what style cider you want to drink (brut to sweet) and mix well
4. You now have natural, sweetened, still cider ready to drink 
5. Pop bottle in the fridge and consume within 48 hours (or it might explode!)
B) Sparkling cider
1. Ensure the hydrometer reading is no more than 1.0000 before adding sugar and once sweetened, put the bottle into the 15 degree storage cupboard for 2 weeks for secondary fermentation. Add no more than 1 flat teaspoon of sugar for secondary fermenetion otherwise your bottle will explode). 
2. Carbon dioxide will this time to absorbed into the cider rather than escaping through the air lock (as you have the lid on the bottle) and a little more alcohol is being produced. 
3. After 2 weeks, pop in the fridge and consume - if the cider is dry, you can add a little more sugar or honey at this stage prior to drinking immediately.

CONGRATULATIONS! YOU’RE NOW A FULLY FLEDGED CIDER MAKER.

It’s been BEE-lightful to be on this journey with you. It doesn’t have to stop here! With our webshop full of goodies, beekeeping and beer tasting experiences galore. PLUS sign up to our buzzing newsletter, where there is so much more of Hiver to discover.

Use the code below for 30% off all beers and ciders!

Shopping Cart

BOOK EXPERIENCES NOW